Peripherals
Mouse Sensor Lens
Q: Should you clean your mouse sensor lens regularly, at what frequency and what cleaning methods are recommended?
Yes, you should try to clear any debris not only from the lens but the tracking surface itself regularly to reduce the likelihood of such particles affecting the sensors capability to track accurately. Cleaning methods should be those simlar to those of camera sensors and lens. See findings and analysis for more information.
Findings and Analysis
- If you use a fabric tracking surface there is a higher liklihood it has many particles, fibers, hair or other substances which can then be transfered onto your mouse sensor lens.
- The assumed primary causes of such particles getting onto the lens are directly correlated to the conditions of the environment such as air circulation and filtration, rate at which these particles build up, those found directly on the tracking surface, the type of fabric, and the density of weave and threads.
Observations: (See image sequences below)
- Particles build up relatively quick if the tracking surface is not cleaned prior to the lens.
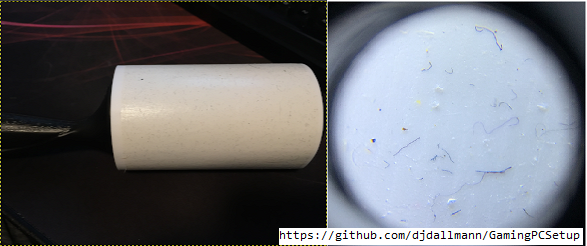
- The microscopic debris is not easily identifiable by sight, using a lint roller over the surface can greatly reduce the amount of particles which remain on the cloth tracking surface prior to cleaning lens.
- The particle debris built up over a 1 week period was minimal and had limited impact on user perceived tracking ability.
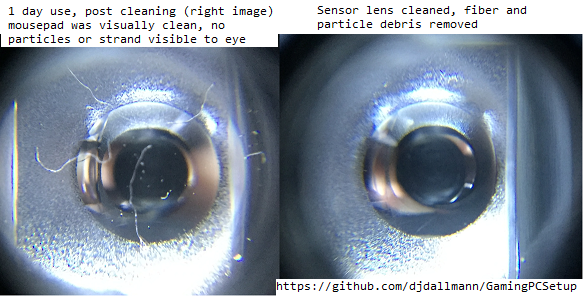
- Initial lens cleaning methods used included very gentle use of a cotton swab to loosen some debris followed by 1-2 shots of compressed air to achieve a clean sensor lens.
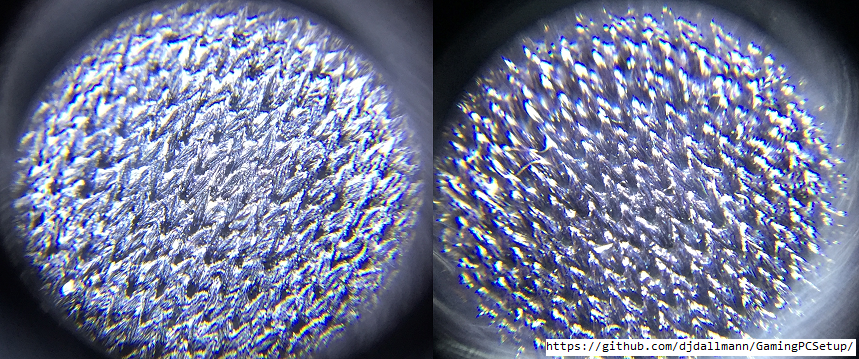
Mouse Lens Particle Analysis - 1 days use without prior cleaning of the tracking surface
Mouse Lens Particle Analysis - Build over 1 week, prior cleaning of both tracking surface and lens

Tracking Surface Particle Removal via Generic Lint Roller
Recommendations
- To clean the mouse sensor lens you would want to use an air dust blower like those used on cameras which should not produce any moisture unlike cans of compressed air, and a lens/sensor brush which would be less likely to scratch the plastic or glass lens.
- Cleaning weekly or every two weeks after the initial tracking surface and lens would probably be sufficient as maintenance to ensure consistent performance overtime.
- Use a mildly adhesive lint roller to remove smaller debris and particles prior to cleaning the mouse sensor lens.
- You can purchase an Illuminated Jewelers Eye Loupe with approximately 40-60x zoom which is affordable, portable and functional to observe the conditions of your mousepad or mouse sensor lens.
Mouse Lift Off Distance (LOD)
Q: Does the mouse LOD affect tracking on different surfaces, and do wear patterns also influence tracking with the same LOD?
The LOD may have positive or negative influence on mouse tracking, users experience, type of surface and its particulates will also influence the sensors capability to track movement accurately.
Findings and Analysis
- The lift of distance (LOD) of a mouse refers to the distance in which the sensor will register input from its surface, and usually measured in millimeters.
- The most common benefits of a low LOD is to reduce unwanted tracking when a user briefly lifts the peripheral off the tracking surface and respositions it in an existing area which is preferred or in preparation for the next intended gesture.
- Users that tend to have lower sensitivity where their preferred application sensitivity and the use case (game/application) require them to reposition their mouse frequently prefer a lower lift off distance throughout the session.
- Likewise a user with a higher sensitivity may be less likely to resposition their mouse dependent on their play style, techniques and the use case. A higher sensitivity would reduce the amount of physical movement required to cover the same distance in the application.
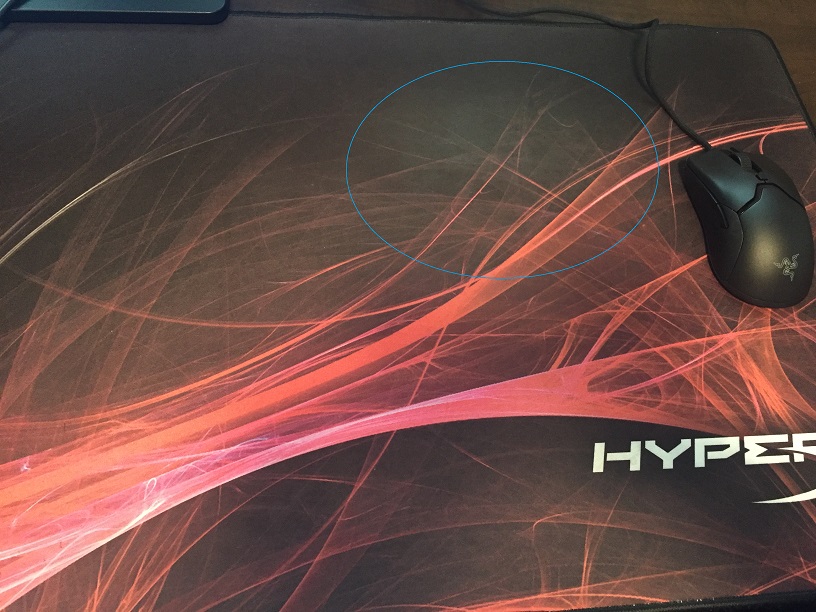
Mousepad - HyperX Fury S XXL - Wear
- The area circled in blue in the image below represents a common wear pattern from repeated casual gaming use (slightly over 1 years time) and is likely a combination of degradation of the mouse surface due to friction, temperature, transfer of skincells or material from the peripheral, mouse skates or plastic.
Microscopic image of the fabric consistency
Demo: How does LOD affect sensor tracking over degraded fabric surfaces?
- As a demonstration I've selected a brand new Razer Viper Mini (Model:RZ01-0325, Firmware: 1.03, Polling: 1000hz) to demonstrate how the sensors LOD calibration setting reacts to the surface and the area of wear on the HyperX Fury S XXL.
- Video: https://www.youtube.com/watch?v=A1u5M7Cn4ik
- Observations:
- There is minimal impact to mouse tracking on less used areas with both low and high LOD calibration
- Tracking across common wear patterns (although visually negligable) with a low LOD has a signficant impact on mouse tracking.
- Using a higher LOD to accomodate for the tracking issues on worn area provides a more consistent user experience except the concerns with higher LOD itself, although there may be a very subtle difference in tracking when the sensor is transitioning between both worn and less used surface areas.
Recommendations for tracking on fabric surfaces
- Ensure your surface is consistent and level for optimal tracking
- For cloth mousepads, you may be able to increase the consistency of the surface by washing your mousepad with a mild detergent on target areas, see if others with your mousepad have done similar with success.
- Not all surfaces may be compatible with your mouses sensor LOD calibration, and not all mice have a wide range of LOD calibration settings which could result in a poor user experience depending on the surface.
- Test regularly for tracking inconsistencies, compare slightly worn areas to less used areas.
- Particles on the mouse sensor lens may also impact your tests and observations, consult with or see your manufacturers guidelines for cleaning your sensors lens.
Mousepad Surfaces
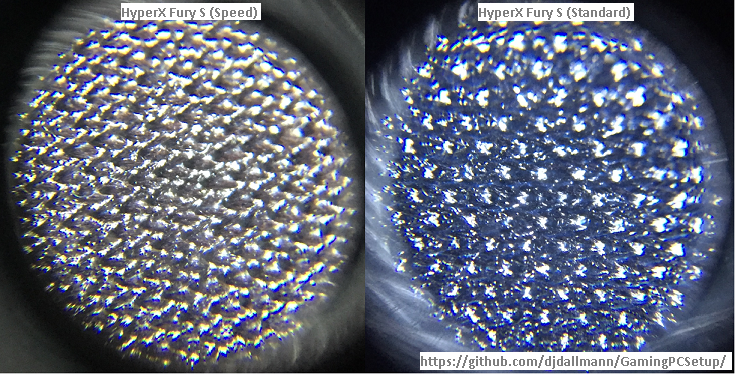
Q: How are the HyperX Fury S Speed and Control fabrics different in texture? Do they have noticeably different resistance as a tracking surface?
Yes, the overall physical texture of the mousepad is quite different, one being ultra smooth similar to silk (Speed) where as the other as a more rough feeling to the touch but not necessarily abrasive. Both however have very similar resistance when moving the mouse on the tracking surface when using 100% PTFE mouse skates.
Findings and Analysis
- There are visual microscopic differences between each tracking surface, upon closer look you can see that the speed version of the HyperX Fury S has a much tigher weave in comparison giving the fabric which gives it an ultra smooth finish, the standard version of the pad although very consistent texture is much looser and feels abbrasive to the touch.
- During use both provide nearly the same experience or feeling of resistance unlike some other cloth pads marketed as Control pads when using 100% PTFE mouse skates.
- The primary potential differences otherwise are:
- How each feel to the touch.
- If the mouse tracks better/worst given the differences in the weave/texture.
- The color of the fabrics, which may also have some impact to tracking. Speed has a colored pattern where as the Standard version is a solid black color.
Universal Serial Bus (USB)
Q: Can you define the interrupt moderation rate for USB controllers? Do different versions of windows have different default values?
Yes, with intel based usb controllers you can interract with the mapped virtual address space of the USB controller to change the interrupt moderation (IMOD) register. Windows 7 has been observed to use a interrupt moderation rate of 1 millisecond (ms) where as Windows 8 and 10 both use 50 microsecond (us) interrupt moderation rate which is significantly different than Windows 7 which might explain some reported experiences between each but there are other variables as well. See findings and analysis for more details on this topic.
Thanks to ucode on overclock.net for raising awareness on this capability.
Findings and Analysis
How To
- Probably the most interesting part for readers is the how do I vs the actual technical detail so I'll start with that, for more technical information see the section following this to fill in the gaps.
- First download RWEverything – Read & Write Everything or use a tool with similar capability.
- Use the ordered steps below and screenshots to help navigate your way to the xHCI IMOD register.
- Open the tool then Click on the PCI Devices icon, furthest to the left typically.
- From the dropdown menu find and select your Intel xHCI USB Host Controller, you should now see information about that device on the right including the Base Address Registers location e.g. BAR1
- In the PCI window make sure dword 32bit is selected
- Make note of the BAR address on the right and double click that same value in the PCI window this will open a Memory window.
- In the Memory window switch to word 16bit
- Click the value that is in the position 18hex, when selected will be indicated by the numbers in red in the upper left corner of the grid. Make note of this value (Base address offset/Base address space offset)
- Double click the address space field. e.g. Address = 000000000000
- Add the value from step 6 to the current address value plus 24h (Capability register) as demonstrated in the screenshot then press OK. e.g. if the value is 0xF7310000 and the value from 6 was 2000, plus 24 would be 0xF7312024
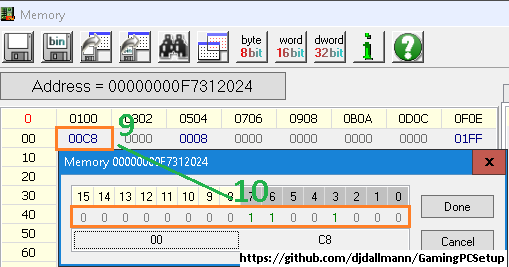
- In the 16bit view you should now be presented with the IMOD register.
- To edit the values double click that value position (1/0) then edit the bits to represent the decimal value you are interested in, remember that if all bits are 0 (zero) then interrupt moderation will be turned off immediately. If you're not familiar with binary or hex, use a decimal to binary converter.
- Note: These settings do not persist beyond a restart or shutdown they will need to be set each time you turn on your computer.
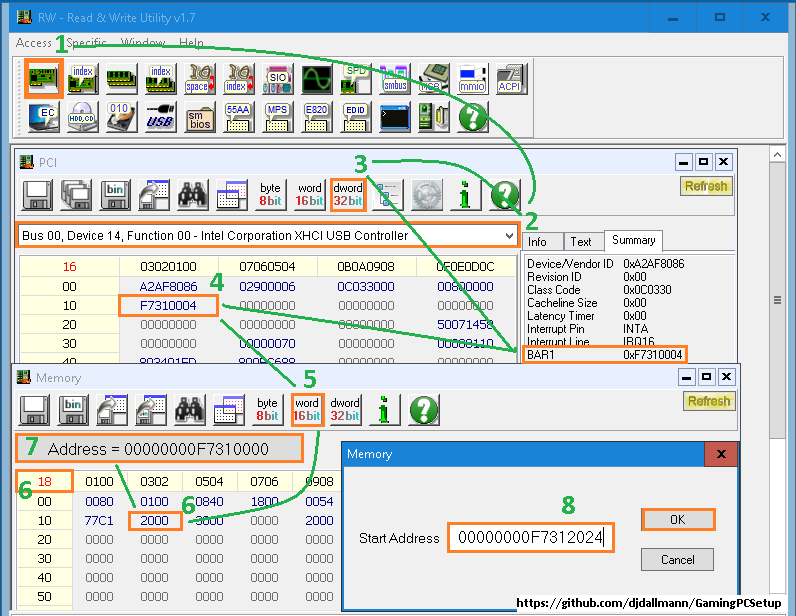
- Orange selections represent the areas of interest
- Green indictors map to the numbered steps above and act as a visual guide
Technical Detail and Reference
- The PCI address configuration space defines how the registers are mapped to memory locations in the operating system, this configuration space stores information for each device such as if the device is MSI and MSIX capable, the MSI message limit, vendor, device classification and many other properties which you also see in the device manager details section for the device.
PCI Configuration Space
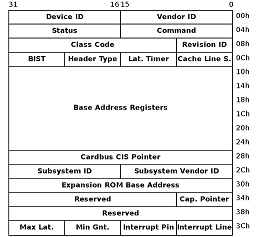
Photo from wikipedia and is under public domain
Intel eXtensible Host Controller Interface (xHCI) for Universal Serial Bus
- This document outlines Intels specifications for the xHCI host controller specification it desribes the address layout, how interrupt moderation works, the location of the interrupt moderation (IMOD) registers, how to change the IMOD register operating state and many other aspects of xHCI through the virtual address space mapped in the PCI configuration space.
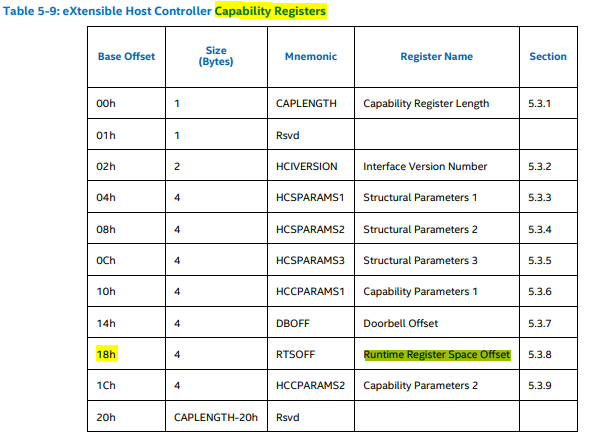
- If you dig through the documentation you'll find it indicates that the IMOD register is in xHCI Runtime Base which is the PCI Base Address Registers(BAR) plus the the value in Base Address Offset which is found in position 18hex from the begging of the PCI BAR e.g. BASE ADDRESS + BASE ADDRESS OFFSET + 24hex
- The PCI base address registers can be found through device manager or through a tool that let's you explore and enumerate the PCI configuration space.
- Device Manager > View Resources by Type > Memory > then locate the USB Controller and you'll then have the approximate base address range.
- The PCI base address registers can be found through device manager or through a tool that let's you explore and enumerate the PCI configuration space.
- The IMOD register itself is intended to have a default value of 4000 (decimal, or 0xFA0 hex), 1 millisecond interrupt moderation rate, the value is specified in 250ns (nanosecond) increments so can be calculated as 250ns x Value = Result. e.g. 250ns x 4000 = 1ms. To disable interrupt moderation the value can be set to 0 (zero).
Intel xHCI - Interrupt Moderation Register Reference
.PNG)
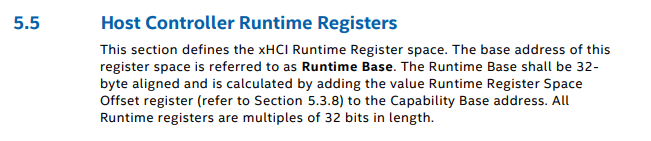
Intel xHCI - Host Controller Runtime Registers Reference
Intel xHCI - Capability Registers Reference